As of now, Heroku doesn’t support auto-deploy from GitLab. So we have to use Gitlab CI to deploy to Heroku. This post will help you to set up auto deploy to Heroku.
For this blog post, we will take a rails app with a Postgres database. We need Gitlab to run the unit tests and deploy to staging and then later to production.
For staging and production, we will keep different branches to make things simpler. It will also make it easier for us to push a hotfix.
Setting up Gitlab CI
First, we have to set up our project to run the tests using Gitlab CI.
You can add new .gitlab-ci.yml file using the templates available in Gitlab web UI. If you prefer to add it manually you can add the following section to set up.
# .gitlab-ci.yml
image: 'ruby:2.7.1'
Then add the services section to support postgres db for the rails app.
services:
  - postgres:11.7

variables:
  RAILS_ENV: test
  POSTGRES_DB: app_test
  POSTGRES_USER: postgres
  POSTGRES_PASSWORD: postgres
  POSTGRES_HOST_AUTH_METHOD: trust
  DATABASE_URL: 'postgres://postgres:postgres@postgres:5432/app_test'
Next, let’s add cache to make the build faster. We can cache the ruby gems, node modules etc
# Cache gems in between builds
cache:
  paths:
    - node_modules
    - .yarn
    - vendor/ruby
Once the basic config is done, let us configure the gitlab ci to run the test cases.
Tests
To run the test cases, we have to first install the missing dependencies like nodejs, postgresql-client (to run migrations), yarn etc. All these installations can be done as part of the before_script.
You can give a name for the stage using stage config in the test block.
test:
  stage: tests
  before_script:
    - ruby -v # Print out ruby version for debugging
    - apt-get update -q && apt-get install nodejs postgresql-client -yqq
    # Install yarn as outlined in (https://yarnpkg.com/lang/en/docs/install/#alternatives-stable)
    - curl -o- -L https://yarnpkg.com/install.sh | bash
    # Make available in the current terminal
    - export PATH="$HOME/.yarn/bin:$HOME/.config/yarn/global/node_modules/.bin:$PATH"
    - yarn install
    - gem install bundler
    - bundle config set path 'vendor'
    - bundle install -j $(nproc)
    - bundle exec rake db:migrate --quiet
    - bundle exec rake db:test:prepare --quiet
  script:
    - bundle exec rails test
Add Environment variables
Before we configure the deployment, we need to add the ENV variables to Gitlab’s project configuration.
To add these navigate to Variables section in CI / CD Settings of the project.
We require the following ENV variables.
- $HEROKU_PRODUCTION_KEY
- $HEROKU_APP_NAME
- $HEROKU_STAGING_APP_NAME
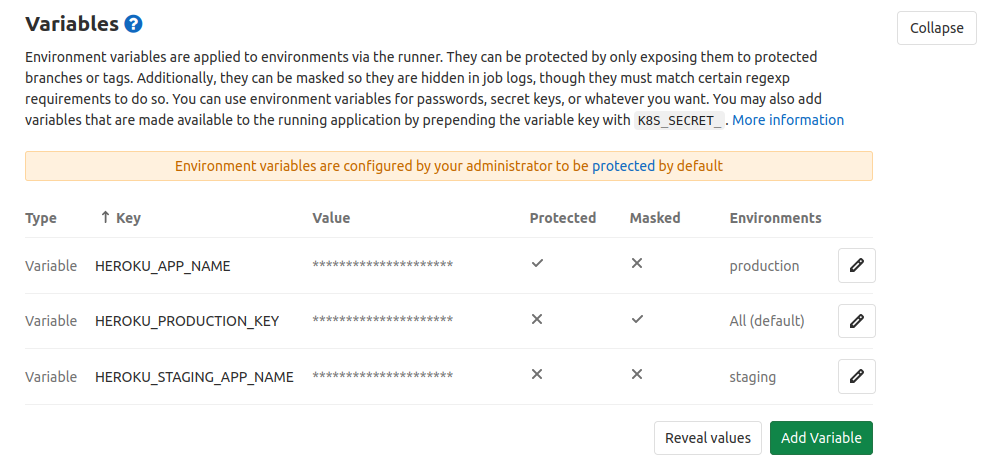
We can mark the variables Protected & Masked depending on our setup.
The protected variables will be exported only in protected branches.
We can configure different environments for the project in Operations -> Environments.
Deploy
Once the tests are passing, we can configure the deployments in the next stage. The deployments to run only from particular branches, ie.,
- from
developbranch, deploy to staging - from
masterbranch, deploy to production
The deployments will be processed with the help of dpl gem. Since we are deploying to Heroku that requires us to run migration manually after each deployment, we should install Heroku CLI before the deploy stage.
.before_script_deploy:
  before_script:
    - curl https://cli-assets.heroku.com/install-ubuntu.sh | sh
    - gem install dpl

# This deploy job uses a simple deploy flow to Heroku, other providers, e.g. AWS Elastic Beanstalk
# are supported too: https://github.com/travis-ci/dpl
production:
  type: deploy
  extends: .before_script_deploy
  environment: production
  variables:
    HEROKU_API_KEY: $HEROKU_PRODUCTION_KEY
  script:
    - dpl --provider=heroku --app=$HEROKU_APP_NAME --api-key=$HEROKU_PRODUCTION_KEY
    - heroku run rails db:migrate --exit-code --app $HEROKU_APP_NAME
  only:
    - master

staging:
  type: deploy
  extends: .before_script_deploy
  environment: staging
  variables:
    HEROKU_API_KEY: $HEROKU_PRODUCTION_KEY
  script:
    - dpl --provider=heroku --app=$HEROKU_STAGING_APP_NAME --api-key=$HEROKU_PRODUCTION_KEY
    - heroku run rails db:migrate --exit-code --app $HEROKU_STAGING_APP_NAME
  only:
    - develop
The .before_script_deploy template will help us to share the before_script between the production & staging.
While writing this blog post the version of stable dpl gem was 1.10.15 & the master branch was pointing to new work in progress 2.0 version.
When you are reading the documentation of dpl please pay attention to the version.